B.ED COURSE MATERIAL
Monday, 19 February 2018
BEST WEBSITES FOR LEARNING BIOLOGY
1.cell structure
https://www.youtube.com/watch?v=URUJD5NEXC8
2.Photosynthesis in plants
https://www.youtube.com/watch?v=3pD68uxRLkM
3.Human Endocrine System
https://www.youtube.com/watch?v=NINaidIdt4M
4.Classification of vertebrate animals
https://www.youtube.com/watch?v=DVUxMMAueuU
5.Cell division
https://www.youtube.com/watch?v=DwAFZb8juMQ
3.Human Endocrine System
https://www.youtube.com/watch?v=NINaidIdt4M
4.Classification of vertebrate animals
https://www.youtube.com/watch?v=DVUxMMAueuU
5.Cell division
https://www.youtube.com/watch?v=DwAFZb8juMQ
Wednesday, 6 December 2017
BEST WEBSITES FOR LEARNING BIOLOGY
1. MORPHOLOGY OF FLOWERING PLANTS
http://www.askiitians.com/revision-notes/biology/morphology-of-floweringplants/
2. HUMAN HEART ANATOMY ,FUNCTIONS & FACT
https://www.livescience.comhuman-heart.html/34655-
3. SEED DISPERSAL
https://www.sciencelearn.org.nz/resources/103-seed-dispersal
4. HUMAN NERVOUS SYSTEM
http://www.innerbody.com/image/nervov.html
5. RECOMBINANT DNA TECHNOLOGY OR r DNA TECHNOLOGY
http://www.biologyexams4u.com/2013/10/steps-in-recombinant-dna-technology.html#.Wie-IdKWbIU
Wednesday, 22 November 2017
HOW TO OPERATE COMPUTER
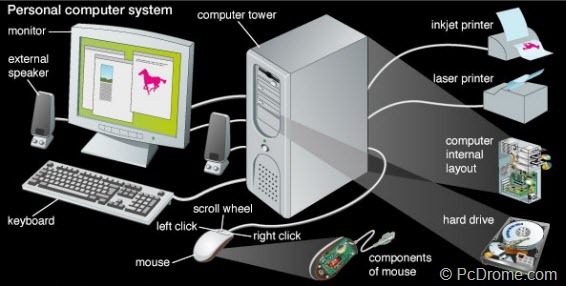
This procedure attempts to outline the basics in operating a computer system based on the assumption that it is running under the Microsoft Windows XP Operating System platform with normal components such as CD or DVD drive, Network Interface Card, and video card installed in the CPU. The steps outlined are formatted in such a way that it is applicable to the two most common computer system architectures: the desktop and the laptop. Essentially, a desktop computer is just what its name suggests. It is big enough to sit on the desk and is considered as the most common type of computer system. A laptop or sometimes referred to as a “notebook” is a smaller and more mobile version of the desktop machine and is normally used in the same manner but with relatively lower power requirements.

Materials Needed:

Materials Needed:
- CPU
- keyboard
- monitor
- mouse
- speakers
- printer
- Operating System
- keyboard
- monitor
- mouse
- speakers
- printer
- Operating System
Step 1
Prior to powering up the computer system, make sure that the power cord is firmly connected to the back panel of the CPU and is plugged into the wall socket.
Step 2
Check if the video cable is firmly screwed to the port of the video card with the other end connected to the back panel of the monitor.
Step 3
Make sure that both the keyboard and mouse pointing device are securely plugged to the back panel. Also, check if they are connected to the correct port by checking on the markings. Steps 1 to 3 are essentially easy to do because aside from the mouse and keyboard devices, other components can only be plugged into their proper ports preventing the novice user from interchanging them.
Step 4
When all connections are secure, start up the machine by pressing the power button normally located in the front panel of the CPU.
Step 5
Depending on the configuration of the machine, a username and password may be requested; otherwise, the Operating System may be loaded directly to display the desktop to the user.
Step 6
Other basic operations that can be done include adjusting monitor settings in Step 8. Installation and launching of software is outlined in Step 10. Navigation of the file system is detailed from Step 15.
Step 7
The proper way to shut down or turn off the computer system is by clicking on the 'Start' button and choosing the 'Turn Off Computer' option. This will display the options to 'Standby', 'Restart', or 'Turn Off' the machine.
Step 8
To adjust the monitor settings, right click on any blank portion of the desktop and select the 'Properties' option from the context menu.
Step 9
On the 'Display Properties' window, select the 'Settings' tab to adjust the resolution of the screen. The 'Themes' tab will allow the loading of pre-designed Windows themes. The 'Desktop' tab provides the way for changing the color of the desktop as well as the displayed wallpaper. The 'Appearance' tab provides the various options of changing the behavior of the windows, icons, and other elements of the platform, while the 'Screen Saver' tab shows the option to allow the monitor to go on standby or display animation.
Step 10
To extend the functionality of any computer system, software is normally installed into the local hard drive. A software installer may be through some media like a CD or DVD or from being downloaded from the Internet.
Step 11
For CD or DVD installers, insert the installation disk in the CD or DVD drive of the machine. This will be automatically read and launched by the Operating System.
Step 12
When the installation process is initiated, a new window will normally be displayed to the user. Majority of newer installers provide either a default or an advanced installation procedure. In most cases, simply click on the default process to allow the installer to complete the entire process with minimum user intervention.
Step 13
Upon completion of the installation process, a user may be prompted to reboot the machine. Follow the guide in Step 7 to accomplish this task.
Step 14
To launch the software, simply click on the 'Start' Menu, choose 'All Programs' and select from the menu the program intended to be run. An alternative to this process is to check if a shortcut link is created on the Desktop. Clicking this icon will also launch the associated program
Tuesday, 31 October 2017
Subscribe to:
Comments (Atom)